After a couple of weeks off following the marathon cleaning and painting session I managed to get out in the garage this weekend. So, now the car is fully clean and tidy (except for one little blemish on the drivers front wing) my attention turned to starting to re-install the mechanical parts of the car.
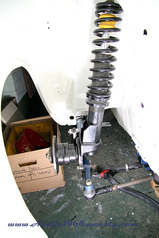
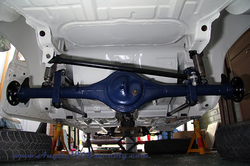
First up was the front axles, these hubs were put on, the bearings looked to be in pretty good order so just re-packed them with grease and then bolted them back together with new nuts and captive system. All runs smoothly with no wobble, grinding or tightness. I then put the uprights, anti roll bar, steering rack and TCAs back in the car to see what it all looked like and to start to get the alignment right (camber and toe).
First up was the front axles, these hubs were put on, the bearings looked to be in pretty good order so just re-packed them with grease and then bolted them back together with new nuts and captive system. All runs smoothly with no wobble, grinding or tightness. I then put the uprights, anti roll bar, steering rack and TCAs back in the car to see what it all looked like and to start to get the alignment right (camber and toe).
All looked generally OK and except there is a bit too much camber for my liking. After a bit of a search it looks like the top mounts are Alachi 105e ones with added camber and caster. With my TCAs wound in right the way there is about 4 degs of camber - I was hoping for something around 1.5 degs. So after an exchange of emails I have ordered the Alachi eccentric fully adjustable top mounts, I can then re-use the bearings and circlips.
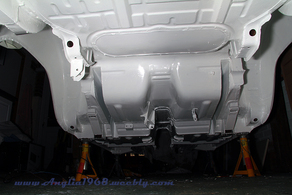
The rear end was then put back together, after much deliberation I have decided to stick with the 4.125:1 diff and see how it goes, I have tried a couple of times to get a 3.77:1 or 3.54:1 but with out luck or they were too expensive so I will wait for a while before deciding. The rear end went back together well using some spacers made from the old drum brake backing plates. I also decided to butcher the Caprisport caliper mounts to fit behind the axle case end flange. After much grinding (metal and teeth) they now fit. Just need some longer studs and replacement brake parts (disc and pads) and all of the running gear will be sorted.
The rear end was then put back together, after much deliberation I have decided to stick with the 4.125:1 diff and see how it goes, I have tried a couple of times to get a 3.77:1 or 3.54:1 but with out luck or they were too expensive so I will wait for a while before deciding. The rear end went back together well using some spacers made from the old drum brake backing plates. I also decided to butcher the Caprisport caliper mounts to fit behind the axle case end flange. After much grinding (metal and teeth) they now fit. Just need some longer studs and replacement brake parts (disc and pads) and all of the running gear will be sorted.
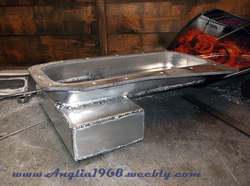
With the running gear well on the way to being restored I turned my attention to a few small jobs. Firstly, I had a mate's Dad pop round to have a look at welding up some engine mounts, modifying the cross member (taking off the mounts) and possibly welding up an exhaust (Spencer Ashley kit). Second on the list was to re-build the pedal box, do an initial fit and mount the brake master cylinder, all goes in well. Thirdly, was to look at demist, I bought a couple of cheap 150w cigarette lighter socket powered demisters which I have taken apart and now have running off one set of switches (the plan is to box them up and use one each side through the screen vents). Finally, I sent off drawings and the OEM sump to have a new one built. Got the pictures back today, and it is looking very good. I initially was expecting a steel sump but Crapengineering who are making it has decided to go with aluminium and I have no problems with that. I am looking forward to getting it and seeing how it all fits together.
So, the next few weeks will consist of buying the final parts for the running gear, installing them, finalising the designs for the mounts and getting those made up. So, by Christmas I am hoping to have all of the running gear in and mounted. I can then start on plumbing, brake runs and finally getting onto the electrics.
So, the next few weeks will consist of buying the final parts for the running gear, installing them, finalising the designs for the mounts and getting those made up. So, by Christmas I am hoping to have all of the running gear in and mounted. I can then start on plumbing, brake runs and finally getting onto the electrics.