1968 Ford Anglia Project
  • Homepage
  • Blog
  • Events
  • Spec
  • Images
    • General
    • Engine / Gearbox
    • Brakes
    • Running Gear
    • Bodywork
    • Interior
    • Electrical
    • Wheels
    • Drawings
  • Videos
  • Weights

Quite a bit to catch up on !

3/9/2016

 
Picture
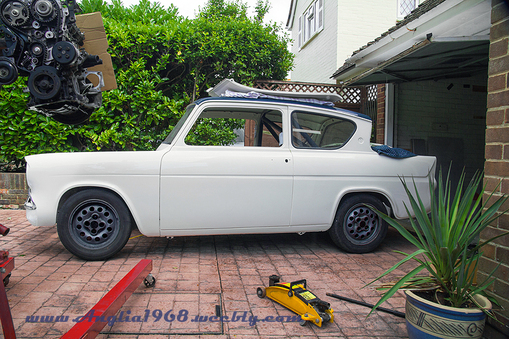
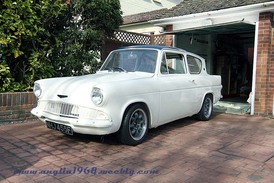
Once all of the various painted part had had a couple of weeks to harden off I then started to put them back on the car. The end result does not look too bad, just need to paint over the stainless bolt heads on the bumpers. Fitting the windows was a bit of a chore but eventually I found a way of doing it without damaging the paintwork so again they are in and functioning, last job there is to fit the final boot badge and hang the doors so the side groove matches up, they are sitting a bit low at the moment, this will also allow me to fit the stainless door sill trims.

Picture
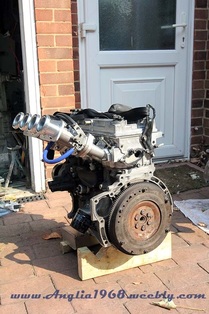
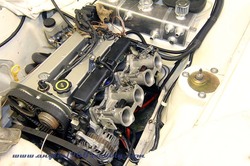
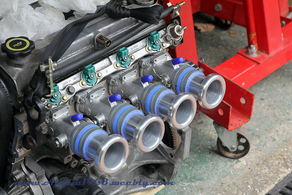
Now this is where the fun starts. The engine was running OK but I noticed that there was a leak from the front crank seal, easy job I thought, bit of 5mm ally bar to lock the cams and a screwdriver to lock the flywheel, same as my old Zetec SE, off the the cambelt comes, then the front pulley, slot in the new seal and reassemble, all should stay in alignment because the pulleys are keyed. WRONG !!!! The Zetec SE has no key ways so the pulleys are all held on by friction and the tightness of the bolts. So, find TDC, again lock off the cams, undo the crank pulley (no key), put in the new oil seal, crank pulley back on, tighten it up as per the online manual I had read. Job's a good 'un. Started her up and it caught and then would not start again - you guessed it - crank pulley had slipped, what the manual did not say was to replace the bolt as it is a stretch bolt and needed tightening to the torque and then 1/4 turn after. So, process over again, this time i used the crank lock pin which I had inadvertently hidden behind the engine mount so that had to come off, new bolt, tighten up. Engine now runs but cylinder 1 and 2 do not sound right, so suspected bent valve. Rather than take the head off to inspect is was cheaper to get another engine that was running right so that's what I did. The new engine was then stripped, cleaned (looked a better engine in fact, no signs of an oil leak and the inlet ports were much cleaner) and readied for installation

Picture
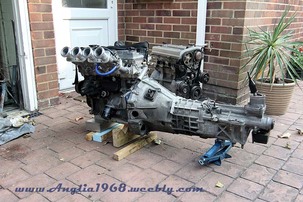
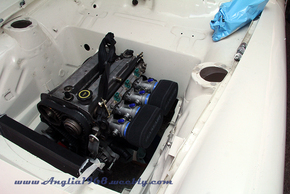
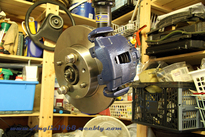
So, whilst I was installing the engine and the original and the Type 9 gearbox had to come out it was a good opportunity to fit the RX8 gearbox I had also picket up. The RX8 box is a 6 speed, helical gear, all alloy gearbox with integral bell housing and a short shift. It is rated to around 250hp/ftlbs, will rev to 9k and the basic gearbox (Aisin AZ6) is used in the Mazda RX8, Lexus IS200, Mazda MX5 mk3, Toyota GT86, Subaru BRZ and Nissan 200SX S15. All off these version have different bell housing hole patterns and input shafts but the RX8 input shaft is a 1" 23 spline version which is the same as the ford one so the Type 9 clutch plate can be used. The gear ratios are a cross between a standard Type 9 (1st) and a Quaife Clubman Type 9 close ratio box (2nd - 6th). Ratios are 1st 3.760, 2nd 2.269, 3rd 1.645, 4th 1.187, 5th 1.000, 6th 0.843 . the beusty of this box is that you get all of this for less than £100 for the box, £115 for the adapter, a few pounds for new bolts (and the engine cost £90 !)  which is way less than even the type 9 bell housing I originally bought and an order of magnitude less than a long first HD type 9.

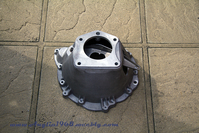
To fit the gearbox to the engine a guy on ebay/turbosports makes adapter plates (freddy686868) which I ordered and it came pretty quickly. The gearbox needed a couple of modifications, the area where the starter motor mounts needed grinding out to fir and when I trial fitted the box in the car the left rear mount needed removing as it fowled the type 9 gearbox mounts that are on the car (not a standard fixture). teh RX8 box is a hydraulic clutch system (external not concentric slave) which I am hoping to adapt to use my cable clutch, initial measurements and mock up looks promising. Just need to make up a rear mount which I think I can use the Cortina one form the type 9 .

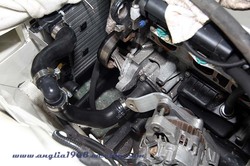
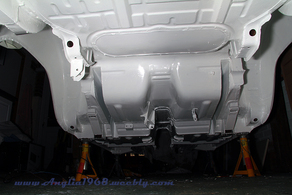
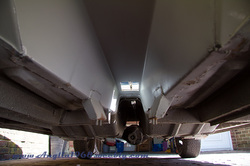
Whilst I was at it I also took the opportunity to tidy up the rear water manifold, getting rid of my home made affair and fitting in line water temp sender adapters, I also decided to keep the the cam belt cover which meant modifying the front engine mount to tidy it it. I also re-routed some of the coolant pipes. So, currently the engine and gearbox are in, they need fully bolting together, a rear mount needs making (temporary on on there at the moment) and then I can get the prop shaft ordered.

getting there ???

3/4/2016

 
Picture
Slow but sure progress over the past couple of months. As previously identified, I did have to remove the throttle bodies to install all of the coolant pipes on the passenger side of the engine. It is a bit of a tight squeeze routing everything down one side including the throttle bodies, the majority of the engine loom, the alternator and the main coolant pipes (mostly 32-36mm diameter). So I did change the throttle bodies to the TJ 42mm DCOE ones which helped a bit and these should be a more reliable and an easier system to tune, not fired the engine up with these on but will do in the near future.

Picture
So the radiator, header tank, engine and heater are all now plumbed in and ready for filling with water/anti-freeeze. As can be seen by the picture to the right there is quite a convoluted set of hoses from the rad top to the engine side housing that had to go around the alternator, I did this in the end using the stock Puma hose and a 90 degree connector but it did tax the grey matter getting there.

Next job on the list was to prepare all of the trim and various brackets for painting, the reason for painting is that I think it will look slightly more modern and also the chrome was badly pitted on most parts so needed sorting out. I was hoping to have a local bodyshop do this but they would not touch the prep and painting of the chrome as they could not guarantee the longevity of the finish. Plan B was for me to prep and paint, pretty painful job but needs must ! So out came the angle grinder, flapper/sanding wheel and wire brush wheel and off I went followed by filling the badly pitted areas and then sanding down to accept painting.

Picture
Whilst doing this, for a little light relief, I made up a steering column cowl to cover the Mk2 Escort stalks, this involved chopping up an Anglia and an Escort cowl and filling in the gap with fibreglass and the filling and sanding to look reasonable.

The next part of the process was aided by a kind donation of a compressor which I added a regulator, a cheap spray gun and some high build primer and Ford Ermine White cellulose paint. I then converted an old gazebo into a spray booth and set to work. Although not perfect the results are OK and will do until I have time to make perfect. So the bumpers (and brackets), grill, front and rear lights, side window frames, seat brackets, door and boot handles and all chrome trim is now Ermine White and will be fitted in a couple of weeks when it has fully gone off and I have taken out another mortgage to cover the cost of the various gaskets and clips that I need.

A couple of other small jobs completed have included: getting quotes for a carpet set which will need to be modified from a standard set because of the tunnel, bulkhead and rear suspension mods and I have also drawn up and got a quote for clamps to hold the trumpets on the throttle bodies, will need to order them soon.

So, with the engine run at least once, all of the wiring and plumbing in place and hopefully in a months time all of the trim and doors done I can start to see the end of the tunnel.

More Odd Jobs

17/5/2015

 
Picture
A few minor jobs done over the weekend and one major one.

The major one first - got the exhaust manifold welded up and it fits nicely, thanks to Mick the Welder (family friend). Took a while to get it in the right place to clear the steering column but all looks OK in the end. I think I will need to put some heat shielding on the chassis member but that is not a big issue.

Minor jobs then - fitted the seat rails to the seats and tried them in the car (sat there for a while in the drivers seat grinning like a Cheshire cat !), fitted the seat belts to the floor eye bolts and roll bar, received some front window brackets from a fellow 105speed-er got these, the winder mechanism and other brackets cleaned and painted, sanded down the bumpers, Por15 metal prepped them and primed them and finally fixed one of the quarter lights that had a broke bracket.

Enigne Mounts and a few jobs

22/2/2015

 
Picture
The period after Christmas is always pretty busy in our house as we have a number of family birthdays, this year was especially heck-tick as we had an 18th and two 80th's. But I did manage to get out in the garage this weekend for a few hours. The big event since the last post is that I have had the Engine Mounts welded up and painted so they have gone on nicely and the engine is hopefully now in its final resting place (almost). I have yet to drill the angle brackets which will be bolted to the chassis but this is the last job to do and then the engine and gearbox will be in. I also got the engine mounts removed from the cross member to give more room for the exhaust and also the oil filter, so that went back on and the front running gear is all now in place. As I have reduced the length of the TCA's I think once I get wheels on I may have to shorten the steering rack ends by about 20mm on each size as well.

Picture
Another couple of odd jobs that I have got finished over the weekend have been to re-mount the throttle bodies on the adapter plate and also shorten the hand brake lever.

When I originally mounted the throttle bodies I did it on the engine, bolting the adapter plate on first and then the throttle bodies. When I came to try and manually balance (using the wire feeler gauge method) I found that the throttle bodies were all at slightly different angles and by the time I got to the the forth one there was no adjustment left. So, I have now stripped it down, re-mounted the throttle bodies so they are all straight, re-bench balanced them and they are ready to bolt to the engine once the engine mounts are done.

When I had mount the engine and got it in place relative to the cross member and the gearbox was on its mounts I found that  when in fourth gear the gearstick was fouled by the hand brake. So after a bit of head scratching I shortened the hand brake so it will all now work together.

Final item for this post, I managed to pick up a late model Mini heater (2 speed) on ebay, so that will be going in at some stage when IO get round to doing the plumbing.

I have a shiny bottom

7/10/2014

 
Picture
Three weekends ago I finished off underside preparation by cleaning down the surface with a petrol soaked rag to remove the last of the underseal, wash with POR15 Aquaclean, wash with water, applied POR15 Metal Prep and carried out a final clean water wash down. This was then wiped down and left for a week to fully dry out. Then began the mammoth job of painting the rest of the underside, three days later and the whole of the underside had had two coats of KBS Rustseal, all seams sealed and a final coat of KBS Rustseal. So the whole process was -

  • Wirebrush of all lose paint and undeseal
  • Wash down with petrol soaked rag
  • Clean with POR15 Aquaclean
  • Wash down with clean water
  • Apply POR15 Metal Prep
  • Wash down with clean water
  • Wipe down with dry cloth
  • Leave for a week in garage to dry
  • Apply two coats of KBS Rustseal
  • Seal Seams with Tigerseal
  • Apply a final coat of KBS Rustseal

Picture
I disassembled the rear axle, removed the diff and drive shafts, cleaned these, the 5 link bars, front uprights, brake brackets and front hubs. Painted all of these with Hammerite so they are all ready to re-fit once the paint has been given time to go off fully. I also trial fitted the rear disc brackets. Unfortunately the Caprisport brackets that bolt onto the outer face of the axle casing do not fit  i.e. put the disc in the wrong place relative to the caliper (about 10-12mm out). After a measure up I concluded that brackets that fitted on the rear of the axle case flange were the once to get, so have ordered a set from Mk2mania.

I also ordered and received the adaptor plate for the throttle bodies from Lasermaster, looked a pretty good fit straight off but with a few slight tweaks and the bolt/stud holed drilled it looks like it will do just the job.  Only job left to do it to get a larger countersink to further recess the bolts for the adaptor to head connection.

Picture
The final job on chassis prep, after finishing the painting last week was to bolt together the engine, gearbox and bell housing and do a trial fit so that I could get measurements for the sump, engine mounts and gearbox mount. It all looks pretty good and looks like I will have some good space around the engine for the throttle bodies and the exhaust. Following these measurements I have developed CAD models of the sump/block mating face and mounting plates for the engine and have sent the sump ideas off for a quote.

So I am now in a position where I can start to bolt parts back onto the car rather than take them off. Rear axle will be first, then the front uprights which I suspect will take a while to get into a position where the camber/toe etc is correct and then I can start of ordering the engine mounts and possibly the exhaust and whilst these are making their way here I can look at door cards and assembling the doors/seals etc. and finalising the designs for the petrol tank , radiator header tank, catch tank and washer bottle and working out the coolant system .

More cleaning but the end is in sight.

14/9/2014

 
Picture
So, more cleaning of the underside of the car. I think I can see the end after three weekends of wire brushing. I have now completed the rear section and one side. So, just the passenger side section and it will be ready for final prep (petrol wipe down, marine clean degreaser , wash, metal prep etch, wash) and then be left for a week to dry out before painting. The front arches have had two coats but need a  third so will go around with seam sealer and then finish off with that third coat. 

Picture
I have also made a couple of purchases - an Omex 710 ecu to run the engine and an Innovate LC2 wide band lambda system plus gauge for mapping the ECU. The Omex is a top of the range ECU and able to run the VCT on the engine and also control the injectors fully sequentially if I needed that in the future. The engine and uprights are back from the machine shop so I can install the spigot bearing. I also go time to trial fit the Caprisport 260 brake kit on the uprights, looks very good and should be plenty to stop the lightweight Anglia.

Picture
The throttle bodies are coming along as well. I have had an adaptor plate CNC laser cut to my CAD drawing, sourced some full radius trumpets and so have had a trial fitting. The TB's and adaptor need a small amount of fettling but all should go together well.

So in general I can see the light at the end of the tunnel in terms of getting to a position where I can start to put stuff back on the car. Still a bit more cleaning to do, painting and also refurb of the rear axle. To sum up, progress has generally been good.

Buying, Cleaning, Painting and Planning!

17/8/2014

 
Picture
Buying

Managed to source the Zetec SE > Type 9 bellhousing and clutch fork and also got hold of a 215mm Pinto clutch,
I already has the release bearing so drive line should all bolt together now.

Second on the list, and quite difficult to find, was a low profile, rear water manifold that will help get the engine 100mm back in the engine bay. Thanks to Shawspeed for sourcing the bellhousing etc. and the water manifold.

I also managed to get hold of a Polo radiator for £26 delivered, bit of a bargain. Other items that I have had delivered included a set of door locks and internal rods, a set of front indicator shells,  a set of Peugeot 205GTI 14" Pepperpot alloys, the correct track rod ends, the Caprisport GTR260 and rear disc conversion brackets, a gear stick, a wiper motor and a matching Sabelt harness to the one I already have. In addition the previous owner called to let me know he had an additional box of bits and a missing front window, this had the original boot lock so I now have a matching set of locks, a few bits of trim and most of all an Escort Mk2 pedal box that the bulkhead had been modified for.

Picture
Cleaning and painting

I had planned to get the car out on the drive and up ion stands so that i could clean, prep and paint the underneath, but the week I had off work to do this had a variable weather forecast so I changed tack and worked on just the front end in the garage whilst cleaning, prepping and painting a load of other parts ready to go back on. Thankfully all I found was some surface rust and the underseal came of fairly easily.

The underneath of the wings up to the bulkhead/front jacking point were wire brushed, cleaned with petrol, washed with POR15 Marine Clean, washed in clean water, treated with POR15 Metal Prep and cleaned again in clean water.  The plan is to leave then to fully dry out over the next week and then paint with KBS Rust Seal paint (off white).

I also gave the brakes, pedal box, cross member and various brackets a coat(s) of paint once I had sourced some Hammerite Dark Blue paint (now discontinued but a great match to the Anchor Blue roof/roll bar). i also touched up the anti roll bar and steering rack with Hammerite black sating paint. Pictures of the painted parts are in the Images section.

Picture
Planning

So on the planning front there has been quite a bit of activity.

1) The engine has been dropped of to a local machine shop to have the spigot bearing cavity enlarged from 17mm to 22mm to take the standard Type 9 / pinto spigot bearing. the 1.7 Puma engine is the only one I can find in the Ford Catalog that is this size !

2)
The front uprights have been dropped off to a local machine shop to have the wheel flanges reduced (132mm IIRC) to fit the RS Turbo Escort discs, the original disc lugs removed and the caliper mounting holes clearanced out.

3) I think I have found a company to make the sump from sheet steel (easier than
modifying the ally sump) and have sent some initial drawings based on the second engine fit for quotation.

4) I have a couple of quotes back to water jet cut the inlet adaptor, still waiting for a couple more (I have cad this up in Autocad)

5) I have found a guy who can make a bespoke fuel tank, radiator header tank,
oil catch tank and washer bottle all at a very reasonable price.

6) I an 90% sure that I am going to go with Emerald for the ECU and have a source for them.


7) I have found a place that can make carpets to a paper/card template.


Initial inspection and inventory

29/3/2014

 
Picture
Today was the day for sorting the shed and garage out so that I know what I have and what I have not.

The first job was to roll the car out onto the drive, jack it up, have a look underneath and in the light of day give it the once over. So, the conclusions are - still impressed with the body, found one slight bubble on the bottom corner of one of the doors which will need sorting, that's it ! Once jacked up, the shocks were wound up a bit so that I can get the jack underneath. I also found that I think I need new track rod ends, no big deal but another thing to add to the list.

Once the Garage and Shed were almost tidy it was time to decant and catalog the five boxes of bits that came with the car. I shalln't bore you with a list of every nut and bolt but here are the omissions - no biggies but will all need sourcing in slow time I suspect -

Wiper motor, gearbox rear mount, door/boot locks, front window and a couple of badges.

So pretty good all in all.

Next job is to identify what the front uprights are so I can spec the brakes properly.  That will be more ebay scouring then.

    Father & Son Team

    I'm a mid-life crisis sufferer who just had to have another project.

    My son is impressionable and willing to learn the ways of "the petrol".

    Together we will learn, laugh, cry and probably fight in the creation of an automotive gem.


    Categories

    All
    Bodywork
    Brakes
    Electricals
    Engine/Gearbox
    Interior
    Misc
    Preparation
    Running Gear

    Archives

    September 2016
    April 2016
    January 2016
    November 2015
    October 2015
    May 2015
    April 2015
    March 2015
    February 2015
    January 2015
    November 2014
    October 2014
    September 2014
    August 2014
    June 2014
    May 2014
    April 2014
    March 2014

Powered by Create your own unique website with customizable templates.