1968 Ford Anglia Project
  • Homepage
  • Blog
  • Events
  • Spec
  • Images
    • General
    • Engine / Gearbox
    • Brakes
    • Running Gear
    • Bodywork
    • Interior
    • Electrical
    • Wheels
    • Drawings
  • Videos
  • Weights

There she blows !

12/1/2016

 
Picture
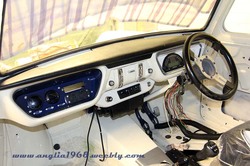
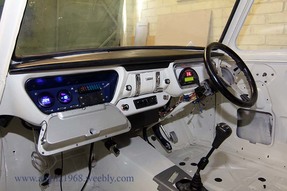
Over the past month I have managed to get some time on the car and have been dealing with quite a few electrical head scratchers. The result is that I think I am now down to three main problems - indicator switch puts on the hazard warning lights, the dash powers off on ignition and I need to sort out the wiper motor wiring. There are another couple of small niggles but these are easily fixed.

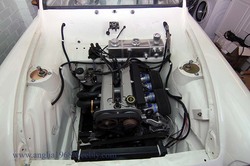
The big headline, after much angst, is that the engine has finally been started and runs OK. I spent quite a bit of time working out why things were not working only to discover that the pins on the ECU loom plug were not connecting to the ECU pins. A fairly simple fix, removed the pins from the plug, gave then a squeeze with a pair of pliers, replaced them and all connections seem to be OK. Once done, the ECU saw the crank sensor, power was supplied to the coil pack and sparks were present, fuel pump primes, air and coolant temperature were registering and the throttle position sensor was calibrated OK. First turn of the key was encouraging with the engine trying to fire but no joy, swapped the wires around on the crank sensor and next turn of the key she fired up. It ran for a few seconds OK once the throttle bodies were opened up slightly (idle screw) but that was all as there is no coolant in the system.  Big result. Once all plumed in I need to check the cam position sensor output and VCT valve operation before starting to do some rudimentary tuning. A big thank you to various car online forum gurus that led me through all of the issues I have had.

Picture
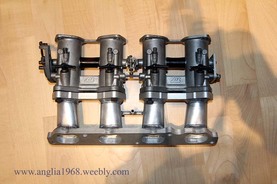
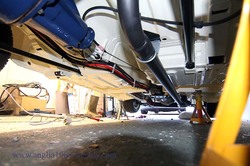
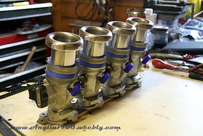
In order to get the coolant hoses in I think I will have to remove the throttle bodies which present an opportunity. I managed to pick up cheap a set of TJ 42mm parallel DCOE throttle bodies and an alloy matched manifold for the Zetec SE. These should give a bit more room on that side of the engine as they are angled upwards more and also give slightly better flow into the engine and better throttle response without messing about with either the pedal pivot point or throttle cable quadrant (on the bike TBs).

Whilst all this has been going on I have finished preparing the trim for painting so will get quote for that. So, there is light at the end of the tunnel and I can start to see the whole project coming together in the next four or five months, just in time for the Ace Cafe  gathering in July.

Electrickery !

22/11/2015

 
Picture
I managed to get a couple of days on the car over the last month. First job was to fit the hand brake cable. I used a Sierra one that had to be shortened but used the original handbrake cable mounting braked to fit it to. MK Engineering provided a new eyelet end which made the job pretty easy.  I also bought a pair of flexible hoses for the front brakes from Furore, made to measure and delivered in two days. These have been fitted completing the brake install, all ready to be topped up with fluid and bled, checking for leaks as we go.

Picture
The next big job was to start the wiring loom install. This is in multiple parts. The main section is the Premier Looms wiring loom that I had made to spec, added to this is the ETB and Omex flying looms for the dash and the ecu, in the engine bay is the Puma loom and finally a whole host of different switches, gauges etc. So, under the dash the various parts have been connected up with spade connectors so that any issues can be remedied easily. In the engine bay they are soldered to reduce the risk of corrosion/shorts etc. So as of today the vast majority of the loom is in and 75% is connected up, just a couple of issues with how the ecu is connected to the main loom for the fuel pump circuit and I need to look at borrowing a crimp tool for the main battery cables and earth straps. So hopefully a start up over Christmas is still on the cards.

Long time no see !

17/10/2015

 
Picture
Over the summer there has been a lot going on so I have had very little time on the car, all of which has been spent rubbing down the chrome trim and priming it ready for paining later int he year.
Fast forward to September and things have started to progress again. Three main jobs have got completed: fitting the exhaust, fitting the tanks and completing prep on the dash.
The exhaust had been modified, initialially fitted and then welded up remembering this is an Escort Pinto 2.25" manifold and system that runs straight down the driver side of the car. Since then I have sanded it back to bare metal, treated it and painted it in high temperature paint and then fitted it to the car and finished it off with a back box. It should sound rather fruity I think, may have some issues with noise levels if I do a track day in it in the future.

Picture
The fuel and combi (oil catch, radiator header and washer water) tanks arrived over the summers so these have now been fitted to the boot and engine bay respectively. The fuel tank and battery box are now bolted to the boot of the car and connected to the fuel pump and filter with kunifer and flexible hosing. The breather / filler overflow pipes are not quite right but not far off. The other end of the fuel pipes is also connected top the fuel rail on the engine.  Also in the engine bay the combitank has been installed. The original idea was to centrally mount it but the layout of the coolant pipes meant offsetting it to the passenger side, not as aesthetically pleasing but easier and more efficient to fit the pipework.

Picture
The third main job was to modify a glovebox lid to fit the digidash, fit the various electrical components in the glovebox and fit the heater thus almost completing the dash. The digidash was mounted into a spare glovebox lid using fibreglass, filled with p38 filler and sanded to a finish. This will be pained in body colour at a later date. the glovebox liner was a more challenging job fitting the ECU, wideband lambda gauge, vacuum gauge, three USB socked, two power sockets (12v and USB charger points) and the fuse box. eventually after a bit of head scratching I came up with a layout that seems to work OK. The mini heater and fibreglass radio panel were fitted after again a bit of thought but in the end look pretty neat, re-locating the ignition key to the ratio panel also work i think. So now the dash is almost ready to accept the wiring loom (from Premier Looms, Malaga, Spain) which arrived over the summer.
The other small job has been to sand down, fill and sand some more the various chrome trims for the outside of the car which will be body colour painted later. Not a quick job but will set the car off nicely with a more modern look.
So, over the next month or so I will be fitting the loom and then hopefully going for a start up before Christmas !!!!!!

More cleaning but the end is in sight.

14/9/2014

 
Picture
So, more cleaning of the underside of the car. I think I can see the end after three weekends of wire brushing. I have now completed the rear section and one side. So, just the passenger side section and it will be ready for final prep (petrol wipe down, marine clean degreaser , wash, metal prep etch, wash) and then be left for a week to dry out before painting. The front arches have had two coats but need a  third so will go around with seam sealer and then finish off with that third coat. 

Picture
I have also made a couple of purchases - an Omex 710 ecu to run the engine and an Innovate LC2 wide band lambda system plus gauge for mapping the ECU. The Omex is a top of the range ECU and able to run the VCT on the engine and also control the injectors fully sequentially if I needed that in the future. The engine and uprights are back from the machine shop so I can install the spigot bearing. I also go time to trial fit the Caprisport 260 brake kit on the uprights, looks very good and should be plenty to stop the lightweight Anglia.

Picture
The throttle bodies are coming along as well. I have had an adaptor plate CNC laser cut to my CAD drawing, sourced some full radius trumpets and so have had a trial fitting. The TB's and adaptor need a small amount of fettling but all should go together well.

So in general I can see the light at the end of the tunnel in terms of getting to a position where I can start to put stuff back on the car. Still a bit more cleaning to do, painting and also refurb of the rear axle. To sum up, progress has generally been good.

    Father & Son Team

    I'm a mid-life crisis sufferer who just had to have another project.

    My son is impressionable and willing to learn the ways of "the petrol".

    Together we will learn, laugh, cry and probably fight in the creation of an automotive gem.


    Categories

    All
    Bodywork
    Brakes
    Electricals
    Engine/Gearbox
    Interior
    Misc
    Preparation
    Running Gear

    Archives

    September 2016
    April 2016
    January 2016
    November 2015
    October 2015
    May 2015
    April 2015
    March 2015
    February 2015
    January 2015
    November 2014
    October 2014
    September 2014
    August 2014
    June 2014
    May 2014
    April 2014
    March 2014

Powered by Create your own unique website with customizable templates.