Over the summer there has been a lot going on so I have had very little time on the car, all of which has been spent rubbing down the chrome trim and priming it ready for paining later int he year.
Fast forward to September and things have started to progress again. Three main jobs have got completed: fitting the exhaust, fitting the tanks and completing prep on the dash.
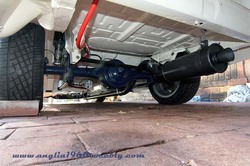
The exhaust had been modified, initialially fitted and then welded up remembering this is an Escort Pinto 2.25" manifold and system that runs straight down the driver side of the car. Since then I have sanded it back to bare metal, treated it and painted it in high temperature paint and then fitted it to the car and finished it off with a back box. It should sound rather fruity I think, may have some issues with noise levels if I do a track day in it in the future.
Fast forward to September and things have started to progress again. Three main jobs have got completed: fitting the exhaust, fitting the tanks and completing prep on the dash.
The exhaust had been modified, initialially fitted and then welded up remembering this is an Escort Pinto 2.25" manifold and system that runs straight down the driver side of the car. Since then I have sanded it back to bare metal, treated it and painted it in high temperature paint and then fitted it to the car and finished it off with a back box. It should sound rather fruity I think, may have some issues with noise levels if I do a track day in it in the future.
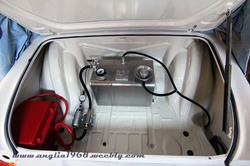
The fuel and combi (oil catch, radiator header and washer water) tanks arrived over the summers so these have now been fitted to the boot and engine bay respectively. The fuel tank and battery box are now bolted to the boot of the car and connected to the fuel pump and filter with kunifer and flexible hosing. The breather / filler overflow pipes are not quite right but not far off. The other end of the fuel pipes is also connected top the fuel rail on the engine. Also in the engine bay the combitank has been installed. The original idea was to centrally mount it but the layout of the coolant pipes meant offsetting it to the passenger side, not as aesthetically pleasing but easier and more efficient to fit the pipework.
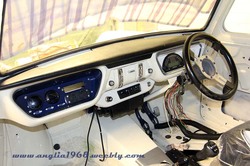
The third main job was to modify a glovebox lid to fit the digidash, fit the various electrical components in the glovebox and fit the heater thus almost completing the dash. The digidash was mounted into a spare glovebox lid using fibreglass, filled with p38 filler and sanded to a finish. This will be pained in body colour at a later date. the glovebox liner was a more challenging job fitting the ECU, wideband lambda gauge, vacuum gauge, three USB socked, two power sockets (12v and USB charger points) and the fuse box. eventually after a bit of head scratching I came up with a layout that seems to work OK. The mini heater and fibreglass radio panel were fitted after again a bit of thought but in the end look pretty neat, re-locating the ignition key to the ratio panel also work i think. So now the dash is almost ready to accept the wiring loom (from Premier Looms, Malaga, Spain) which arrived over the summer.
The other small job has been to sand down, fill and sand some more the various chrome trims for the outside of the car which will be body colour painted later. Not a quick job but will set the car off nicely with a more modern look.
So, over the next month or so I will be fitting the loom and then hopefully going for a start up before Christmas !!!!!!
