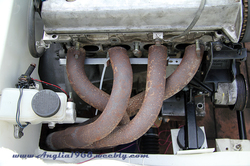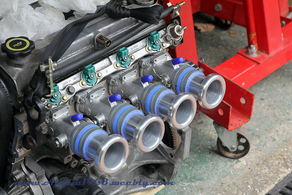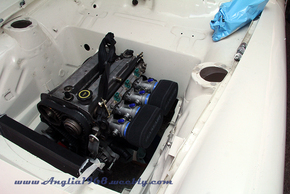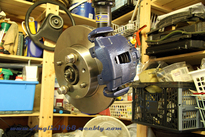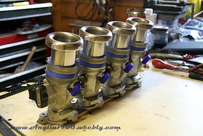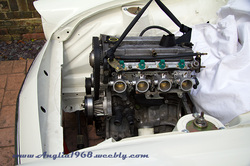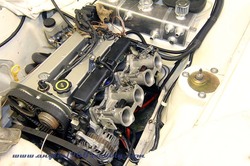
Slow but sure progress over the past couple of months. As previously identified, I did have to remove the throttle bodies to install all of the coolant pipes on the passenger side of the engine. It is a bit of a tight squeeze routing everything down one side including the throttle bodies, the majority of the engine loom, the alternator and the main coolant pipes (mostly 32-36mm diameter). So I did change the throttle bodies to the TJ 42mm DCOE ones which helped a bit and these should be a more reliable and an easier system to tune, not fired the engine up with these on but will do in the near future.
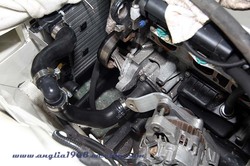
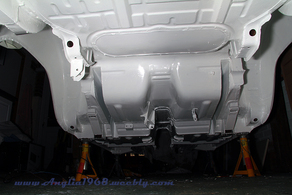
So the radiator, header tank, engine and heater are all now plumbed in and ready for filling with water/anti-freeeze. As can be seen by the picture to the right there is quite a convoluted set of hoses from the rad top to the engine side housing that had to go around the alternator, I did this in the end using the stock Puma hose and a 90 degree connector but it did tax the grey matter getting there.
Next job on the list was to prepare all of the trim and various brackets for painting, the reason for painting is that I think it will look slightly more modern and also the chrome was badly pitted on most parts so needed sorting out. I was hoping to have a local bodyshop do this but they would not touch the prep and painting of the chrome as they could not guarantee the longevity of the finish. Plan B was for me to prep and paint, pretty painful job but needs must ! So out came the angle grinder, flapper/sanding wheel and wire brush wheel and off I went followed by filling the badly pitted areas and then sanding down to accept painting.
Next job on the list was to prepare all of the trim and various brackets for painting, the reason for painting is that I think it will look slightly more modern and also the chrome was badly pitted on most parts so needed sorting out. I was hoping to have a local bodyshop do this but they would not touch the prep and painting of the chrome as they could not guarantee the longevity of the finish. Plan B was for me to prep and paint, pretty painful job but needs must ! So out came the angle grinder, flapper/sanding wheel and wire brush wheel and off I went followed by filling the badly pitted areas and then sanding down to accept painting.
Whilst doing this, for a little light relief, I made up a steering column cowl to cover the Mk2 Escort stalks, this involved chopping up an Anglia and an Escort cowl and filling in the gap with fibreglass and the filling and sanding to look reasonable.
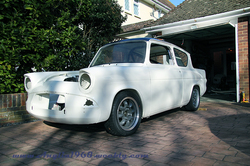
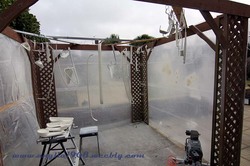
The next part of the process was aided by a kind donation of a compressor which I added a regulator, a cheap spray gun and some high build primer and Ford Ermine White cellulose paint. I then converted an old gazebo into a spray booth and set to work. Although not perfect the results are OK and will do until I have time to make perfect. So the bumpers (and brackets), grill, front and rear lights, side window frames, seat brackets, door and boot handles and all chrome trim is now Ermine White and will be fitted in a couple of weeks when it has fully gone off and I have taken out another mortgage to cover the cost of the various gaskets and clips that I need.
A couple of other small jobs completed have included: getting quotes for a carpet set which will need to be modified from a standard set because of the tunnel, bulkhead and rear suspension mods and I have also drawn up and got a quote for clamps to hold the trumpets on the throttle bodies, will need to order them soon.
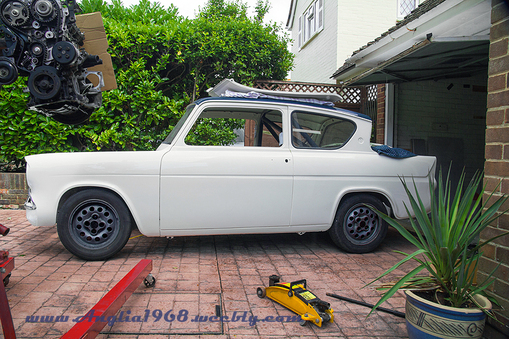
So, with the engine run at least once, all of the wiring and plumbing in place and hopefully in a months time all of the trim and doors done I can start to see the end of the tunnel.
The next part of the process was aided by a kind donation of a compressor which I added a regulator, a cheap spray gun and some high build primer and Ford Ermine White cellulose paint. I then converted an old gazebo into a spray booth and set to work. Although not perfect the results are OK and will do until I have time to make perfect. So the bumpers (and brackets), grill, front and rear lights, side window frames, seat brackets, door and boot handles and all chrome trim is now Ermine White and will be fitted in a couple of weeks when it has fully gone off and I have taken out another mortgage to cover the cost of the various gaskets and clips that I need.
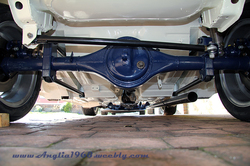
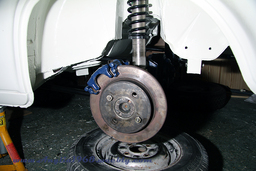
A couple of other small jobs completed have included: getting quotes for a carpet set which will need to be modified from a standard set because of the tunnel, bulkhead and rear suspension mods and I have also drawn up and got a quote for clamps to hold the trumpets on the throttle bodies, will need to order them soon.
So, with the engine run at least once, all of the wiring and plumbing in place and hopefully in a months time all of the trim and doors done I can start to see the end of the tunnel.